


 Entrance Door Designer
 Download our tiled roofs brochure
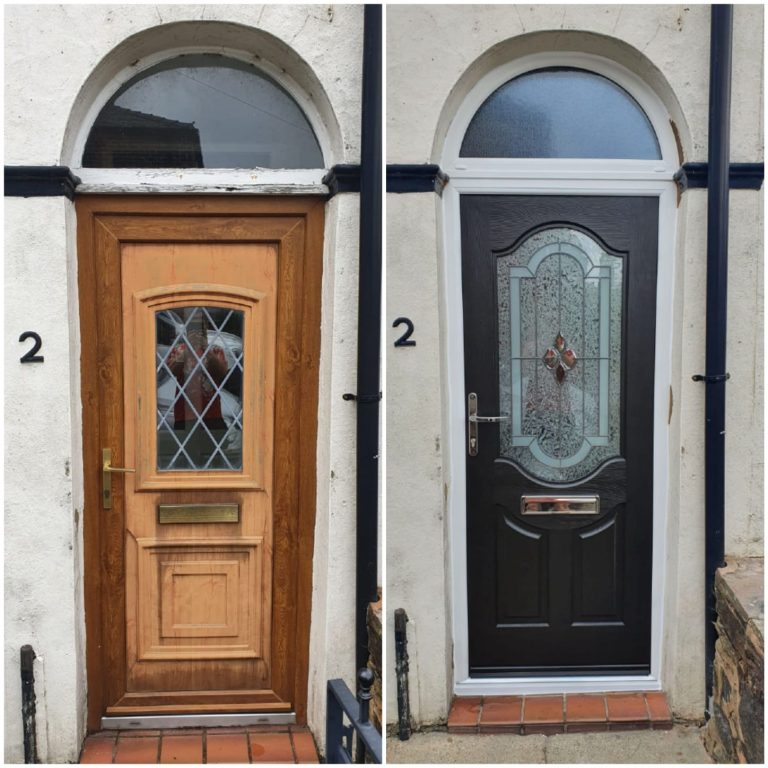
Is your door driving you crazy with its incessant dripping and puddles of water on the floor? Don’t worry, fixing a leaky door is easier than you think with a little DIY know-how. In this step-by-step guide we will talk through the main things to look out for. These include:
- Check the drainage holes
- Check the door sweep
- Seal the gaps
- Adjust the door
- Install a drip cap
- Test for leaks
At Plan-it Windows, we have specialist knowledge of everything from doors and rooflines to windows and conservatories. If you’ve got specific questions about your home, get in touch and our friendly teams will be on hand to help.
1. Check the Drainage Holes
Doors tend to have three drainage holes at the bottom of the frame, you can find them in the middle and each corner. They are small slots that help direct rain water from the face to the outside of the frame. To check if these are blocked, use a small, thin object like a screwdriver or a skewer to see if any debris has built up. Still not sure? Pour a little water on them – if they are clean, the water should easily drain through. If they do need cleaning out, this can usually be done quickly and easily with a hoover.
2. Check the Door Sweep
The door sweep is the strip located at the bottom of the door. Over time, it can become worn out or damaged, allowing water to enter – this can especially happen if it’s an adhesive door sweep. Have a look for any signs of wear or tear. If it’s damaged, remove it using a screwdriver and replace it with a new one.
3. Seal the Gaps
Gaps around the frame can also contribute to leaks. Making sure there’s adequate caulking to seal any gaps you find can be an easy fix for some leaks, while weatherstripping provides a tight seal against water infiltration. Ensure that the weatherstripping or caulk is applied evenly and smoothly for maximum effectiveness.
4. Adjust the Door
Sometimes, leaks are simply the result of misalignment. Check if the door is properly aligned with the frame. If it’s not, you can adjust the hinges to bring it back into alignment. This can be a tricky process to get right, so if you’re unsure, give our team a call on 01204 373203 and we can take a look at it for you.
5. Install a Drip Cap
If the leak persists, consider installing a drip cap. A drip cap is a small metal or plastic strip that deflects water away from the entrance. It can be easily attached to the top of the frame using screws or adhesive. This additional layer of protection can prevent water from seeping through gaps and causing leaks.
6. Test for Leaks
After you’ve tried the above repairs, it’s time to test if your fixes have been successful. Use a hose or a bucket of water to simulate rain and check if any water enters through the problem areas. If everything remains dry, congratulations! You’ve successfully fixed your leaky door.
Let us handle it for you
Home improvements are a big decision, so you’ll need an expert you can trust. From uPVC doors and windows to conservatories with tiled roofs – no matter the job, we’ve got hands-on experience in it all. Whether you’re in Bolton, Bury or the Manchester area, give our team a call and we will give your home the perfect finishing touch.
Our customers are saying great things
The quality and standard is excellentI wouldn't hesitate to recommend Plan-It Windows. They installed replacement windows, panes and a complete front door. The quality and standard is excellent. The team was friendly and very professional. Everything was left clean and...Andrea Henry

I would highly recommendEveryone from Plan-It Windows has been helpful, polite and prompt. I am very happy with the windows that Pete and Dave installed. They did a very neat and tidy job and were pleasant company throughout...Rose Osborne

I am very pleased with the work doneI am very pleased with the work done. Professional team, quick quote and great customer service. Reasonable prices. I would recommend this company and would be happy to use them in the future.Rafal Jablonski


Start your project with Plan-it
A committed team of suppliers and installers, we have over 20 years’ worth of expert knowledge and experience in the North West’s residential sector. Plan-it Windows are wholeheartedly dedicated to delivering a jargon free, supportive and tailor-made service to each and every customer.
Start your project
"*" indicates required fields

Fantastic service, replaced all the doors, windows and roofline on our old house and did a great job. High quality and great value. Got them to do the roofline and cladding on our new home and again excellent workmanship and great value. Can’t recommend enough.
